Shutting down a walk-in cooler is a nightmare, routine maintenance is time-consuming, and repairs appear to be expensive.
How could you reduce operational downtime, maintenance, and repair for walk-in boxes?
Fortunately, there are simple actions you may do to reduce commercial walk-in refrigerators issues while keeping the box temperature stable. Routine Tune-ups has a significant impact on the reduction of costly emergency service calls.
Unfortunately, most business owners let their equipment run without basic maintenance until emergency repair is required--too late!
The following is a list of the bare minimum maintenance requirements for cold storage rooms to keep them functioning properly and reduce repair expenses.
DIY Tips for Walk-in Cooler & Freezer Maintenance
Maintaining your walk-in box is crucial to ensure its efficiency and longevity. Here are some DIY tips and best practices to keep your walk-in box in top condition:
Remember, routine maintenance is key to avoiding costly repair and ensuring the walk-in box operates smoothly. By following these DIY tips and best practices, you can keep your walk-in box in excellent working condition.
A professional-grade tuneup list is provided. Based on years of experience, good HVAC technicians have trained eyes and measuring instruments to spare owners lots of headaches and can help them prevent costly shutdowns.
Best Temperatures for Walk-in Box
One frequently asked question is, "What is the best temperature for a cooling walkin?"
Equipment owners need to ensure that they adhere to the guidelines set by local health departments, codes, and authorities. The FDA (Food and Drug Administration) requires that food be stored below 40°F (4°C) to ensure food safety. For practical purposes and to meet most requirements, complying with NSF/ANSI Standard 7, which sets standards for commercial cooling systems, should get you close to meeting requirements.
Basic Cooling Cycle

Defrost Timer with defrost TERMINATION option
All walk-in freezers are equipped with Defrost Timers. These timers play a crucial role in the sequence of operations by shutting off the compressor and initiating the melting process for any ice accumulated on the evaporator coil. The specific settings for defrost timers can vary among HVAC specialists.
Typically, well-functioning units commonly employ a defrost cycle of 4 times for 40 minutes each within a 24-hour period. However, for systems with aged or subpar gaskets, or those experiencing infiltration issues, technicians might opt for a more frequent defrost cycle, sometimes reaching up to 6 defrosts.
In instances where systems are compromised, such as freon leakage, low refrigerant levels, or restrictions in components like the thermal expansion valve (TXV) or filter dryer, we've observed technicians implementing as many as 10 defrost cycles per day. Excessive defrosting hints at underlying issues, prompting the need for a comprehensive investigation into the root cause of the problem.
It's crucial to note that an extended defrost time can lead to higher-than-desired temperatures, potentially contributing to premature inventory spoilage. Striking the right balance in defrost cycle frequency is essential to optimal operational conditions and ensuring the longevity of the stored perishables. In cases where prolonged defrosting proves challenging, it might be wise to consider the possibility of walk-in freezer compressor replacement or a complete walk-in freezer replacement. Ultimately, the decision hinges on both the quality requirements and financial considerations.
Fortunately, some defrost timers come with a walk-in box Defrost Termination Option. In simple terms, this means that if there is no ice formation on the evaporator or if the ice melts fast enough, the defrost timer will bypass the time-based defrost cycle and allow the default operating cycle to resume. This means the compressor will run again achieving the desired temperature.
Following are common defrost timers with a termination option:
Mechanical Defrost Timer
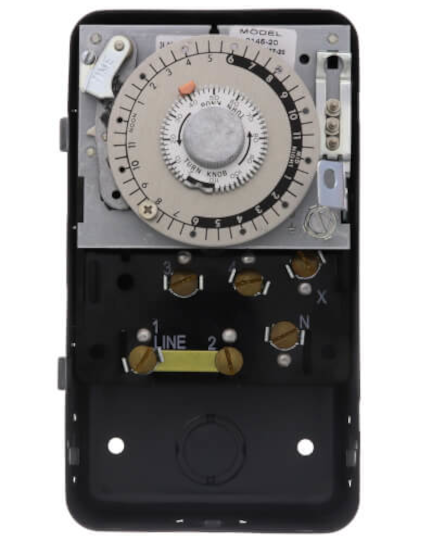
Pros: Cheapest in the market and they work well, aged HVAC technicians seem to be well-versed with this old-style technology. The most known and easiest to configure are Paragons 8145 and Paragon 8141 carried by RoberShaw Defrost Timer.
Cons: Require Time adjustment after each power loss
Electric Defrost Timer
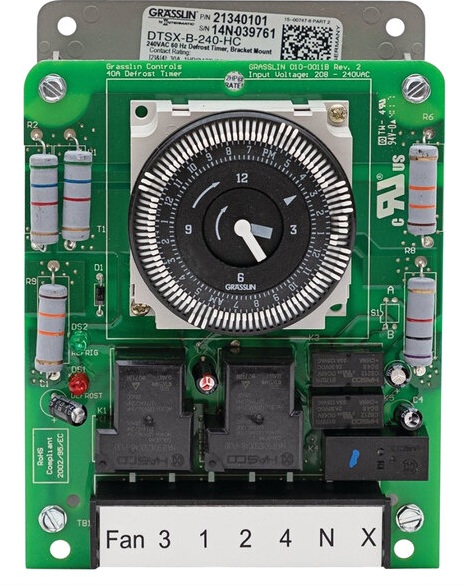
Pros: With an embedded battery it does not require time adjustment with power loss. Also, this model could set defrost cycles in increments of 15 minutes providing the user with much more flexibility. As a German design, Graesslin Defrost Timers are very popular and known to be rigid.
Cons: Occasionally in dusty environments the clock gets stuck
Digital Defrost Timer
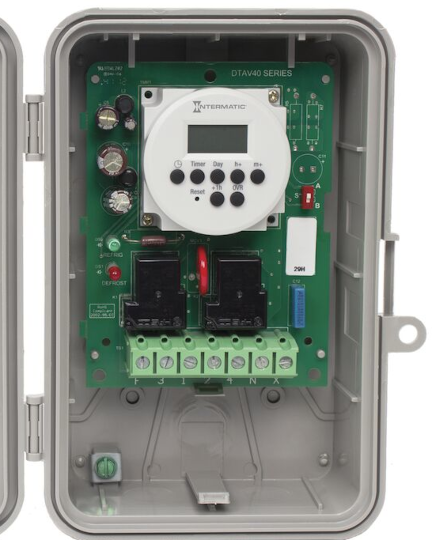
Pros: This model offers much more flexibility to set up the clock and defrost time intervals, with embedded batteries, it does not require time adjustment with power loss which is an excellent feature. Intermatic Defrost Timers seem to be leading the way by the HVAC community.
Cons: Slightly more expansive than counterparts, it seems like a challenge for some aged technicians
Thermostats and defrost timers are of significant value in maintaining the optimal functionality of the walk-in freezer. It ensures that the defrost cycle is initiated only when necessary, preventing unnecessary downtime and helping control the amount of moisture in the freezer.
While we remain impartial to any particular brand, it's noteworthy that two major players, KE2therm, with mobile or computer management, have gained approval among industry experts for their thermostats and defrost timers. Implementing the right defrost cycle setup is both an art and a science, crucial for efficient operation and moisture control in the walk-in freezer. For further insights, you can refer to this PowerPoint publication or delve into this defrost analysis reading.
Frozen Coils in walkin
Among the most common causes of a walkin system NOT cooling is frozen coils. As discussed in our publication iced-up AC coils, they manifest in many shapes or forms, the leading causes of frozen walk-in box coils are similar but more involved.
- Air Flow problem (Fan Not Running)
- Defrost Issue (Defrost Timer, Defrost Heater, Bad Sensors)
- Low Refrigerant Charge
- Restriction in the refrigeration cycle
- Others (Poor Door Gaskets, Poor Operations, Open Doors)
How to repair Frozen Coils
It is tempting to recommend shutting down and then call for professional help. Rather we advise you to call your trusted HVAC expert and follow their guidance. The pattern of ice formation on the evaporator will give the technician a good idea of what could be the correct source of the problem thus expediting the diagnostics process. Shutting down the unit and prematurely melting the ice might eliminate the visual diagnostic clues that are necessary for proper troubleshooting.
Not all ice patterns are equal or identical. For instance, frozen ice that extends all the way back to the compressor might hint at a system running low on charge and further signature of a leaking system. The upper 1/2 of the evaporator coils frozen might indicate a restricted system or poorly adjusted TXV. The bottom 1/2 of the evaporator coils frozen might suggest a broken Defrost heater. Left or right 1/2 frozen coils could be a good indication of a fan motor with a bad bearing. These are merely visual cues to guide experts in expediting diagnostics but are not 100% bulletproof to the root cause of the problem. Many times evaporator coils freeze as a result of multiple causes. A good HVAC service company goes beyond the basics and runs a full diagnostic to prevent future potential problems.
Cold Storage Rooms LifeSpan - Repair or Replacement?
Continuing our exploration of walk-in coolers, these refrigerated storage units represent a significant investment, typically costing between $15,000 and $30,000, not including install expenses. Understanding the average lifespan of your walk-in cooler is vital for effective planning and budgeting, especially considering the various factors that influence its longevity
- Usage Frequency: The more frequently the door is opened, the more wear and tear it endures, potentially shortening its service life.
- Care: Regular Tune-up extends the life of your equipment. Neglecting maintenance is a recipe for a disaster and can result in costly emergency repairs and reduced lifespan.
- Environmental Factors: The environment in which the walk-in box is situated can impact its lifespan. Indoor units may be exposed to high temperatures, while outdoor units may face challenges like rain, snow, rust, and UV exposure.
- Operational Behavior: Storing acidic products uncovered such as cut tomatoes, lemons, or oranges directly in the walk-in cooler can also accelerate wear and tear on the evaporator; it's advisable to store such items in covered containers.
- Brand and Model: The brand and model of your walk-in freezer can also play a role in its lifespan. Many popular brands such as KeepRite, Russell, and Heatcraft, share common components such as the same compressor, thermostat and evaporator, but differences in additional protective components such as Low-Pressure Switches and Anti-Shortcycling Time Delays can affect longevity..
On average, a well-maintained walk-in cooler can last between 10 to 15 years, with some units surpassing the 30-year mark.
Continuing on, it's important to know that you don't usually have to replace the whole walls of a walk-in cooler. Instead, you might might consider a much friendlier budget option such compressor replacement, condensing unit replacement, or evaporator replacement.
To put it simply, sometimes it's smart to think about getting a new walk-in cooler install when lots of parts start getting old and hard to find, or when recharging freon becomes very expensive. That's when it might make more sense to get a new cooler instead. New appliances often have better technology and work more efficiently, which can save you money in the long run when energy cost go up. It's always a good idea to talk to an expert for advice on what to do next..
Troubleshooting Drain Line Issues in Your Walk-in Cooler: Tips and Solutions
Is your walk-in cooler experiencing drainage problems, giving you the cold shoulder? Regardless of the evaporator brand Bohn or, Amerikooler drain line issues are common reasons why a walk-in cooler may fail or stop working efficiently. These drainage pipes are essential peripherals to the refrigeration system, responsible for handling excess water.
Walk-in fridge Drain Line Cleaning Maintenance
One of the top reasons for walk-in cooler malfunctions is clogged drain lines. These drain lines are separate from the refrigeration system but are vital for removing excess water. Regularly inspect the drain pan for debris, obstructions, and ice buildup. Ice accumulation in the drain line indicates a blockage. As part of an HVAC preventive maintenance program, it is recommended to blow compressed air or use a drain snake once a year to prevent clogs and avoid potential headaches.
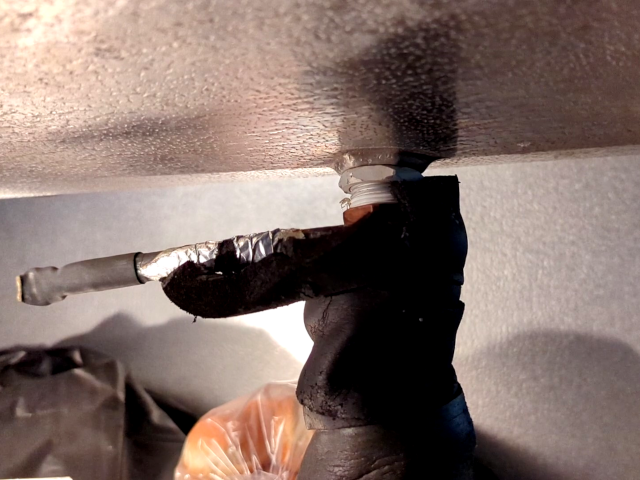
Drain Line Freezing and Heaters
In some cases, water in the drain line of a walk-in freezer can freeze and cause an obstruction. To prevent this issue, HVAC contractors often install drain line warmers. These warmers help to keep the water from freezing in the drain lines, ensuring proper drainage.
However, it is crucial to ensure that these heaters are correctly installed. Improper installation and insulation can lead to the warmers functioning as a source of heat, resulting in a freezer that is not cold enough. Proper installation and maintenance of these heaters are essential to maintain the efficiency and performance of your walk-in cooler.
In conclusion, regular drain line cleaning and proper use of drain line heaters are essential for the efficient operation of your walk-in cooler. By following these tips and solutions, you can prevent drainage issues and ensure your walk-in cooler operates smoothly, providing optimal refrigeration for your business. Such is the case in the Master-Bilt.
Strip Curtain or Air Curtain for an optimal walk-in cooler?
When considering whether to use strip curtains or air curtains in a walk-in cooler, the ideal choice is not always straightforward; it depends on various factors. Refrigeration systems commonly face Infiltration issues, especially when doors are frequently opened, as highlighted by experts from Larkin among others.
Addressing this problem is crucial to the efficiency of refrigeration equipment. While responsible owners and managers may take steps to minimize door openings, some operators may unintentionally or intentionally leave doors open for extended periods. Even with training and incentives, these practices persist, affecting equipment performance.
The primary design goal is to keep cold air circulating within the conditioned space and prevent or minimize infiltration.
Here are some solutions for your consideration:
Strip Curtains for cooling systems
These classic solutions have stood the test of time. They are budget-friendly, with no recurring electricity charges, no moving components, and they only require periodic cleaning and sanitation. Installation is simple and can often be done independently—a "set it and forget it" solution.
Few concerns include:
- Excess curtain preventing the door from shutting properly.
- Heavy curtains potentially pushing against and dislodging items when supplies are brought into the cooler.
Air Curtains for walk-in cooler
Studies walk-in boxes presented before the Department of Energy (DOE) suggest that air curtains can reduce compressor runtime by up to 27%. If proven true, this result could be a significant benefit for owners. A 27% reduction in compressor runtime may translate to an extended compressor service life and fewer service calls.
Ultimately, the choice between strip curtains and air curtains depends on your specific needs, budget constraints, and the characteristics of your walk-in cooler. Whether you opt for the simplicity of strip curtains or the potential energy savings with air curtains, addressing infiltration is essential for optimal refrigeration system performance.
Time-Based Open Door Alarm Take Care of Unwanted Visitors!
While adding a Time-Based Open Door Reminder may appear to be a stretch and an over-engineering annoyance. Based on our experience, this strategy worked and greatly reduced operators' open-door irresponsibility. According to customer feedback, managers did not need as much training and incentive for their workers to keep the walk-in box door locked - the door alarm performed the training.
A small low-budget Time Based open-door warning might suffice but some owners will opt for more sophisticated solutions even better with email notifications.
Is less than 2 minutes the correct time?
Think about how much time it takes to open the door and then close it for entry/exit. 20 seconds at Most.
Our "undercover" observations confirmed major bad habits, blocking walk-in box doors with either a milk cart or some bungee cord or rope for over 5 minutes and sometimes for over 30 minutes period. This bad habit causes serious infiltration in this wonderful Bally walkin-freezer. The main 2 to watch for are 1) food supplier operators while unloading their trucks and organizing food inside the box and 2) food establishment crew members.
To reduce this infiltration we recommend using dollies or carts to enter supplies inside the box in bulk and reduce open-door time.
Good Practice for Cold Storage Rooms
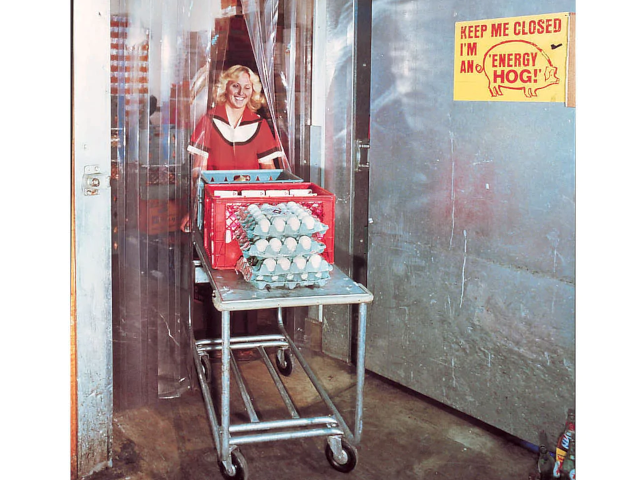
Photo courtesy of plasticstripcurtain.com
Poor Practice for Cold Storage Rooms
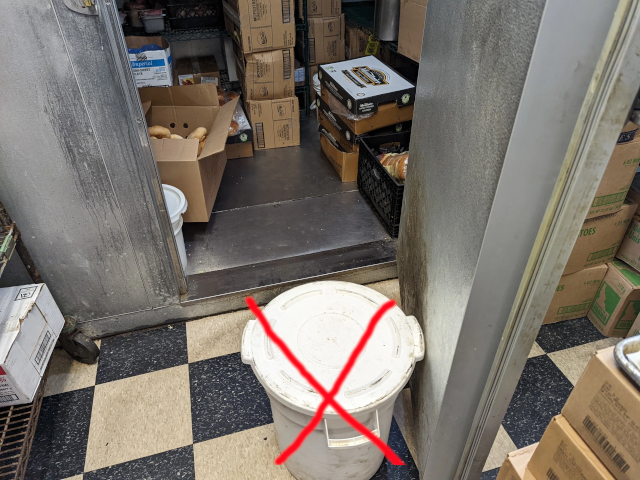
Blocking walk-in cooler doors will raise the average temperature and increases the compressor run time
Ready For a Walk-in? You Better Clean That Condenser Coil First!
The first step to condenser coil cleaning is to shut the power off (unplug the unit or switch the breaker to the OFF position).
Despite the fact that there is a lot of information regarding coil cleaning on the internet, a lot of it is marketing for cleaning products. Our recommendation is simple and based on information from manufacturers and years of Walk-In Service repairs.
- Shut the power (unplug the unit or switch the breaker OFF)
- Prevent Water from reaching the fan and other electrical components
- Soak the unit with water (about 5 min)
- Rinse the unit with water and dish soap
- Rinse with Water (3 times - 5 times) water needs to come out clear.
- Let the unit dry for (about 10 minutes)
Ideally, use a pressure washer device, a sprayer, or even a garden hose.
Important: know your environment and establish the frequency of cleaning.
Many manufacturers will throw in a guess-estimate number of (every 60 days or 90 days) without knowing your environment. An outdoor condensing unit might be exposed to cottonwood during spring and to leaves during fall. An indoor condensing unit near a kitchen will be exposed to lint, dust, and very sticky fry oil.
Superior manufacturer's guidelines are better detailed and are based on trial and error and mainly awareness: Inspect and clean your coils every month for about a year, then establish benchmarks and patterns. In some situations, you may need to clean the coils only once a year so then why would you clean them every month? It simply is not cost-effective.
The alternative is to have the cleaning done as part of a Tune-up or Refrigeration Preventive Care program.
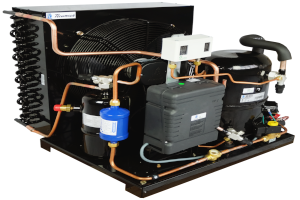
Condensing Unit Location
When it comes to placing your system's Condensing Unit (CU), there are three options: Top mount, Side mount, and Remote. Each mounting configuration has its own set of advantages and disadvantages.
Top Mount Condensing Unit
These CUs come pre-assembled and self-contained, similar to window air conditioners. They are ready to use right out of the box. Some manufacturers, such as Norlake, design the evaporator to be flush with the interior, preserving usable space. However, when used indoors, the heat discharged from the compressor can add stress to your air-conditioned space, especially during summer.
Side Mount Condensing Unit
These CUs are specifically designed for spaces with low ceilings and are placed on the side. However, due to the placement of the system, interior shelf space may be reduced because of the location of the evaporator coil.
Remote Mount Condensing Unit
These condensing units are designed to be placed away from the walls of the cold room, allowing for better use of space without adding extra heat to the conditioned space. They can be installed either outdoors, such as on roofs, or indoors, like in a basement.
When deciding whether to purchase a new condensing unit or to retrofit or repair your existing walk-in cooler, there are several factors to consider. Manufacturers offer two main configurations: outdoor and indoor. Whenever possible, we suggest installing condensing units indoors, preferably in a well-ventilated basement.
Outdoor Condensing Units
Notice these condensing units are equipped with weatherproof casing. Problems arise with exposure to outside environments, including UV, snow, rain, and leaves among others. Not only these units might require an expensive crane to lift the unit to roofs but consider an HVAC tech working on these units in icy conditions, even if the operator will try to work many instruments will simply not work below freezing temperatures
Indoor Condensing Units
The ideal placement would be a properly maintained and clean basement. We have noticed that placing the condensing units in the basement reduced repair service calls and condensing coils cleaning frequency. This location is usually well protected with condensing coils not exposed to leaves, rain, snow, and weather swings. The only problem is basement flooding or on some occasions, poorly ventilated basements inducing oxidation and rust.